About Rob
Rob Williams is Gate Safe’s Technical and Training Manager. Having spent 17 years working in the gate automation sector, he has a wealth of industry experience and his role with Gate Safe means that he is constantly tasked with undertaking independent risk assessments on automated gates – either directly in the field or via the numerous enquiries to the Gate Safe help line. Rob also regularly meets other installers and the interactive nature of the Gate Safe training often throws up intense debates in relation to various technical issues and these can often be translated into valuable advice.
Rob’s safety tips are designed to deliver practical, effective guidance to ensure no detail is missed to ensure the safety of an automated gate or barrier.

-
Light curtains as an alternative safety device
At Gate Safe we always advocate non-contact safety as the primary form of protection for automated gates and barriers. For example, light curtains could be fitted to the support posts of a sliding gate to cover the entire roadway, resulting in ensuring the whole entrance part of the gate is safe from impact, crushing and drawing in risks. This would potentially negate the requirement for the normal photocells and safety edges and is probably more cost effective than a laser scanner.
But it is vital to have the system react correctly when the field from the light curtain is interrupted. Make sure you consider the various risks that could be created by misuse. If you have the gate programmed to revert when closing, should someone decide to ride on the gate, this could cause a nasty drawing in risk against the front portal or post. The same would apply in terms of a possible impact and crushing risk when the gate is opening, and if it reverted, (for example, if a car was to drive through before the gate was fully open you would not want the gate to revert towards the car). We would therefore recommend that the sliding gate STOPS when the light field is broken in both directions of movement, and only resumes travel when the field is cleared. It is also imperative that the gate does not operate in either direction if the light curtain detects something. Additional signage should be added to explain that travel through the gate should only be undertaken when it is fully open. Remember that light curtains are a non-contact safety device and perform a different function to that of safety edges. Their primary purpose is to stop the gate from hitting something or someone.
However, the ability to prevent the gate from making contact with a person or object will rely on the logic board operating in the correct manner. Because the system is heavily reliant on the light curtains to provide protection both in the opening and closing phases of movement, it is very important that the light curtains are truly ‘fail safe’ and are monitored. Type 4 light curtains will meet these criteria. Make sure that the light curtains on either side of the gate leaf do not leave a gap between them which could potentially enable someone to stand between them undetected. Ideally this should not exceed 100mm from the centre line of the gate, otherwise a safety edge will be required on the closing stile of the gate to cover this area.
Not all logic boards will offer the functionality you need, so it is imperative to check before installing any light curtains. At the end of the day, it’s your risk assessment and expertise that will ensure the safety of any automated gate.
-
Ways to stop a sliding gate over travelling
Risk assessment is key to preventing gates from over travelling and below are some points for consideration, but design and construction of the gate is the first place to start. Eliminating the safety and construction risks from the gate design in the first instance will make for an inherently safer system, and one that will also require less additional safety features fitted on the gate when commissioned.
Ideally the gate should be supported between two goal post type supports or at least two hanging / suspension posts. This style of design will prevent the gate falling as a result of one component such as the roller breaking or derailment of the bottom v wheels which could inflict serious injury on anyone near the gate.
Limit switches and their associated actuators or flags are probably the most common way to enable sliding gates to achieve their fully open and closed positions. These rely on the flags being correctly positioned, but importantly they must be secure to prevent them falling off due to vibration or physical contact.
We would recommend not just relying on the grub screw biting into the racking, but to fit an extra Tek screw or similar to ensure a much more solid fixing that will guarantee that the flag cannot fall off the gate. If the flag does come off, the limit switch will not be activated and the gate will over travel and will then be totally reliant on a strong physical stop.
PLEASE make sure that the physical stops in both opening and closing direction do their job properly. If using the end plates on sliders that have internal rollers or wheels in the running tube do not use screws to hold the end covers in place as these can easily be broken if the gate is running at full power. Weld the end plates to ensure they are sufficiently strong to hold them securely in place. Make sure that channels that have support rollers running in them have robust end caps that should also be welded in place. Consider if there is any possibility that the gate rollers could over or underride the end stops, and then take the appropriate steps to mitigate this risk. ideally the roller wants to fill enough of the channel to prevent movement.
After determining the desired travel distance, fit the racking so it stops just after the limit switch would activate. This way if the limit failed the gate would lose drive after this point and would then not be able to be over travel while the motor was running. ‘No rack, No drive’. Of course, this would have no effect if the gate was in manual release, so it is never a substitute for strong physical end stops.
Make sure that the construction of your gate is not going to be the reason for a gate falling accident. Ensure you are fully aware of all the risks by taking the Gate Safe Installer training. If you own a gate and have questions about the gate over travelling you can find an installer that covers your area on our Find Installers By Postcode page

-
Positioning of access control equipment
Sadly, many accidents involving automated gates are caused by people using access control measures - such as push button and key switches - from the wrong side of a gate. This involves either reaching through the pales of a sliding gate or through an unprotected hinge point on a swing gate. This creates a clear risk since the quickly reducing gap may immediately crush them if their arm is not withdrawn in time or clothing may get caught on the moving gate creating a drawing in hazard.
When designing the layout of a new system always think about how a gate will be used and where to safely position the access control. Keep the controls at least 1500mm from the gate, and if this is not possible, fit a suitable shroud to prevent people from activating the gate from the wrong or dangerous side. Also when maintaining a gate that is new to you be mindful to check existing systems that you have a maintenance responsibility for. Just because someone else has fitted a push button to the hang post does not necessarily mean it is safe unless it is suitably protected.
Make sure your knowledge on all aspects of automated gate safety is up to date – book your refresher training now, visit https://gate-safe.org/training/, distance training runs every week and can be scheduled to fit around your work commitments.

-
It's spider season!
Summer is sadly over and autumn is upon us. This means that spiders are out in force and you will be aware that cobwebs can represent a major problem for automated gates, due to their ability to obscure visibility for any safety devices. Now would be a good time to remind your customers that they need to ensure that any spiders’ webs, dirt, or plant debris are removed from the gate and surrounding area to prevent an unnecessary callout. In the current climate when every penny counts it would prove an expensive mistake to request a site visit only to find that the reason the gate is malfunctioning is simply due to a cobweb blocking a sensor.
Check with the customer that they have carried out these simple checks ahead of attending site to avoid a wasted visit. This will save the client both embarrassment and money. A customer is unlikely to be impressed when they received a bill for a callout, which relates to clearing a photocell or laser scanner.
To prevent spiders’ webs in the future, a handy tip is to add some small pieces of a mothball in to the photocell / sensor area to deter spiders from any web making activity!

-
Are Mechanical Safety Edges Safe?
I’m often asked if it’s ok to use mechanical safety edges rather than resistive ones. This normally happens when a member of Gate Safe is taking over an existing site where mechanical edges have previously been installed.
Mechanical edges work by having either an internal cable or lever running through the rubber profile which is attached to a switch at one end. When the edge is activated the cable or lever will pull the switch open. Resistive edges work by the controller looking for a resistor at the end of the edge. When the edge is activated the contact strip running through the edge changes the resistance seen by the controller.
My main concern with mechanical edges is that they cannot be monitored by the control circuit properly. The Standards do say that all electronic safety items should be a minimum of cat2. Unfortunately, this cannot be achieved with a mechanical edge, as the actual edge itself is not electronic. This means that there is potential for the edge to sustain damage and for the system to remain oblivious, consequentially leaving the gate operating in an unprotected and possibly dangerous mode.
While we are talking about self-testing, don’t forget that when possible use the test input on the logic board to monitor the photocells to verify that the relays aren’t stuck or welded together.
There is also the issue of coverage on mechanical edges. Often these have a large area at each end of the edge which is not active, sometimes up to 100mm, preventing coverage of the full height or length of a gate or barrier. This is likely to result in , leaving areas such as towards the hinges on swing gates unprotected - the very area on the gate with the most force!
If you do come across gates with mechanical safety edges fitted, please make sure you carry out a comprehensive risk assessment and test the edges thoroughly to make sure that they are in good condition and cover the areas of risk effectively. Inform the owner of the gates of the need to perform tests weekly to ensure that they are still working effectively and advise of the requirement to report any damage.
Whether you are dealing with mechanical or resistive edges it is important to remember that temperature, especially freezing conditions can have a massive impact on the sensitivity of the actuation with ice build-up possibly preventing the edge from switching at all. In these conditions I would carry out more regular and stringent tests on the system to ensure the system is safe to be used.
If you have any doubts, I would thoroughly recommend replacing the edges with monitored resistive types.

-
Gate Maintenance: Wooden posts
When wooden posts are used to hang gates, it is important to regularly check their condition as part of the maintenance schedule. Overlooking this important structural requirement can result in a catastrophic failure and a potentially serious accident.
A quick and easy way to check for rot is to use a sharp pointed knife. Push the knife into the post at ground level, and if it stays there and grips the blade when you pull it out, then the post is sound. However, if the blade falls out, then the post is possibly rotten, and further investigations should be carried out.
The same test can also be applied to wooden gate leaves - the condition of the wood is especially important near joints, hinge bands etc.
Remember that anyone involved in servicing and maintenance has a responsibility to leave the gate system in a safe condition. This isn’t just associated with mitigating impact and crushing risks arising from the automation, but also relates to the structural integrity of the gate supports and overall installation.
#maintenancematters #woodengates #makinggatessafe
-
Three is the magic number – for gate hinges on swing gate
At Gate Safe we have always been painfully aware that a single point failure, e.g. the failure of a hinge, can lead to serious injury or far worse, as demonstrated by numerous accidents. Given the fact that the British Standard BS EN 12604 has been updated to state that all swing gates should be fitted with three hinges, it remains baffling to note that gate manufacturers continue to fail to address this issue – and run the risk of putting themselves in the firing line in the event of an accident and any associated claims. This is clearly a matter which needs to be taken more seriously within the gate industry.
It should also be noted that, just because the standard was updated, this does not infer that gates fitted prior to that date should be deemed safe. It just means that the danger had not previously been recognised. Installers should protect their business and their reputation by fitting a third hinge or at the very least a tether on any swing gates installed before the new guidance, to prevent the risk of a catastrophic gate fail.
There also appears to be view circulating in the field that fitting a third hinge with an underground operator does not represent good practice, due to the difficulties associated with accurately aligning the hinges. Remember, the purpose of the additional hinge is to stop the gate leaf falling should there be a failure of one of the other two hinges, but it does not need to be offering support all the time. The solution to this problem is to position the third hinge with a little clearance between the pin and the eye, a 19mm pin in a 25mm eye. This is sufficient to stop the gate from toppling over in the event of a hinge breaking.
Recently one of my colleagues excitedly rang me to say that they had found a gate with three hinges and had the photos to prove it. However, upon closer inspection it appeared that two of the hinges were inverted, meaning that all of the weight was being placed on the bottom hinge alone, rendering the gate even less safe than a conventionally supported gate!
Conclusion:
As Gate Safe installers we would ask you to always consider the following three steps:- Ensure that all new gates are supplied with three hinges
- Ensure that any existing swing gates are fitted with a third hinge or a gate tether
- Always risk-assess any site you visit to ensure that you leave the gate safe – and that you are not placing yourself at risk of potential litigation.

-
Gate tethers for swing gates
One of the often-overlooked risks that Gate Safe comes across is that of ‘single point failure’ with swing gates, or put more simply, hinges failing.
In my previous life as an automation engineer with a busy schedule I know it is all too easy to focus purely on the electronic repair you’ve been sent to carry out and not pay attention to the gate and its supporting structure. In reality, all engineers should conduct a risk assessment before carrying out any works. Unfortunately, we see too many reports of gates falling, often with disastrous consequences, sometimes because the engineer didn’t look at the bigger picture.
Not that the industry has taken this on board but BS EN 12604:2017 now states that all new swing gates should have three hinges. And, what about the thousands of gates that are already in existence? Just because the standard has changed it doesn’t mean that all existing gates featuring just two hinges are deemed safe. The risk of single point failure has always been there, it is just that now it has been more formally identified. Also, remember that if you come across gates with inverted hinges these can pose even greater risks. Installations featuring inverted hinges mean that all the weight of the gate leaf is being supported by one hinge, therefore significantly increasing the possibility of failure.
The solution to the above is a simple gate tether. Fixed between the hang post and the gate leaf, the tether will deliver peace of mind that should the worst happen and one of the hinges fail, at least the gate cannot fall.
We understand that adding a third hinge would be the ultimate answer but on many gates this could be very complicated and time consuming to carry out. It would also represent an unacceptably high cost to the customer. A gate tether provides an effective and inexpensive response to a potentially dangerous problem.

-
Obstacle detection on swing gates
At Gate Safe, we often come across swing gates with no safety edges fitted to the bottom of the gate. When we talk to the installer, the excuse often given is that the motors are fitted with obstacle detection and therefore will be incapable of crushing someone. THIS IS INCORRECT!
On swing gates, the way the force is exerted along the gate differs to when it is applied ‘end on’ as per a sliding gate. Swing gates act like a giant pair of nutcrackers, with the strength of the force increasing the closer you get to the hinge. So, this means that when you are setting up the obstacle detection to ensure that the gate has very little force at the slam stile, as prescribed by the standards, by the time you get anywhere near the hinge the force will have increased substantially. If you then try to reduce the force applied by the motor and increase the sensitivity on the obstacle detection, the end result will be the gate has insufficient power to move. The temptation then of course, is to leave the power turned up which creates an unsafe gate with an increasingly dangerous force the nearer you approach the hinge. However, the installer will advise the client that the gate is compliant with the standards … Gate Safe argues that may be the case but it is not safe!
Remember that in addition to the obvious risks of impact and crushing, there is also the potential risk of drawing in and being dragged under the gate leaf as it moves. These are very difficult dangers to protect against if relying solely on obstacle detection. However, it is absolutely essential that these risks are mitigated and for that reason, Gate Safe recommends fitting full length safety edges at the very bottom of both sides of the gates leaves, on all automated swing gates.

-
Tidy wiring results in safer gates!
Tidy wiring results in safer gates!
How many times have you come across a control cabinet or box that when opened, deposits a large ball of wires into your lap? Not exactly the best start for helping you fault find or carry out a maintenance task!
Ensuring tidy and labelled wiring can play a part in leading to a more reliable and safe system overall. If the cable routing and connections are clearly marked, then any subsequent visits will be less stressful and time consuming. It’s definitely worth creating a simple wiring diagram and the time spent on this will reap dividends in the long run. Of course, it is important to remember to revise this every time the wiring is adapted, for example, because you’ve had to change a cable core due to damage. It’s also good practice to take a photo of the wiring after every visit to keep a log of the system. This way it is possible to evidence if other people have been working on it in your absence.
I think it’s a good idea to make sure you have spare cores available when you first pull cables through at the installation stage and always leave draw cords in ducts. This will provide the flexibility further down the line to add additional equipment or replace damaged cables, should the need arise. When the installation is complete, always seal the ducts to avoid the ingress of water and unwanted visitors.
If possible, try to standardise the core colours for your installations as this makes wiring up and fault finding so much more straightforward – and don’t forget to record any changes.
Tidy wiring really comes into its own when you are carrying out maintenance and will result in a more seamless checking of safety circuits, including switching relays and verifying the resistance of safety edges – and ultimately ensuring the gates are left in a safe and compliant state.Very Untidy Wiring

Wiring Done Right

-
Non-contact safety for gates and barriers
Non-contact safety for gates and barriers
Gate Safe has long advocated that non-contact safety should always be the priority for gates and barriers however, before discussing the various options let’s first consider the basics.
Swing gates: have the hinges been designed in such a way as to eliminate reducing gap? Can the gates be positioned to avoid crush hazards?
Sliding gates: has the run back been fenced off? Are the support posts clad with welded mesh?
Anything that can be done to eliminate a risk by effectively designing it out will always be more cost effective than fitting electronic safety measures which will require maintenance and which may at some point fail. Ultimately, an inherently safe physical structure is vital.
When you reach the decision making process in terms of identifying the most appropriate non-contact safety, the choice will be guided by the risk assessment. For sites which feature children or the vulnerable, the safety measures requirements will naturally be greater than for a remote site with a deadman, hold to run operation.
Photocells are the most commonly used device and they are a valuable tool in the gate installer armoury. For low risk sites they should be installed on both sides of the gate as a minimum, fitted as close to the gate as possible. They can also be used if a gate is closing against a wall to protect a crush hazard, especially where an edge Is impractical, for example where a ram is close to a wall in the opening phase. It is important to make sure that photocells are wired into the correct circuit on the logic board to revert the gate in the desired direction. It should also be remembered that these safety devices can fitted in tandem to provide added protection, it is perceived that people straddling a single beam may limit their effectiveness.
Light curtains are the next level up of safety and in principle operate in the same way as photocells. The difference is that they have multiple beams that are spaced approximately 100mm apart and can be up to 2.5m high, protecting the full height of most gates, up to 10m width. The main advantage of these safety devices is that they are less susceptible to false activation due to snow, rain etc. In common with photocells they leave the arc of a swing gate unprotected but for sliding gates they offer a cost effective solution if they are positioned close to the gate, eliminating any ‘dead’ zones.
Laser scanners potentially offer the highest level of safety, providing the opportunity to be fitted onto the gate and actually move with the gate. However, four scanners would be required for a double leaf gate. This would provide the optimum solution for high risk sites, delivering four laser scanners projected forward from the scanner covering the full height and width of the gates, up to a span of 10m. Initially, the programming will - like all things new - be hard to get to grips with, but the more times you do it the easier it will become. Training is available from the manufacturers which we would recommend prior to installation. There are limitations, hinge protection will still need to be considered if the risk has not been designed out and the laser can only work in a ‘line of sight’. Therefore, a ram may block the laser’s sight so it may be necessary to fit the ram at the top of the gate with the laser fitted below it to offer the maximum protection. Similarly, with sliding gates there may be a dead zone between the curtains either side of the gate.
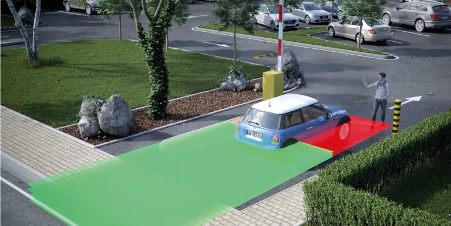
Lasers can also be used with barriers offering safety for pedestrians and cars and can additionally activate the barrier. In the picture below, the red area is the safety zone and the green area represents a virtual push button which opens the barrier when vehicles approach. Pedestrians are not ‘seen’ in the green zone, thereby eliminating the chance of false activation. The only additional risk that would need consideration is the pivot point for the barrier arm.

To conclude, designing out risks by mechanical means is the first step to achieving a safe installation. This should be combined with using the most cost effective non-contact safety devices that mitigate the risks associated with the specific site, taking into consideration the regular users, as well as people who may accidentally come into contact with the gate or barrier.
-
Manual Release
Manual Release
Every automated gate system has - or should have - a means of releasing the drive unit to allow the gate to move in manual operation should the need arise. This could either be by use of a key, a lever or a hydraulic valve, depending on the type of gate and motor used.
The requirement for a manual release is to not only enable the opening of gates in the event of a breakdown, but more importantly, to free a person should they become trapped by the machine – clearly a much more serious scenario. This then means that the keys / lever / tool to disengage the manual release MUST be readily available and close at hand. It is also good practice to ensure the current users are familiar with the release procedures as part of the regular maintenance regime. We recommend using a key safe installed in close proximity to the gates, obviously ensuring that the correct access code is issued to residents or duty holders. There is no point holding the keys in an office 20 miles away!
This leads me on to maintenance. It is very important not to overlook the manual release mechanism in any maintenance schedule. It is not unusual for the mechanism to seize up over a period of time because it is generally not used in the day to day operation of the gates. Underground operators with a detachable shoe release can be especially prone to this and therefore need regular inspection and lubrication to keep the release working. Wear and tear in this load bearing area can also take its toll.
Electro-mechanical rams often have the manual release as part of the gearbox, which can also jam or seize without the correct maintenance. We’ve seen many cases where this has occurred, which can lead to users forcing keys into the locks and snapping them off, rendering the whole unit useless.
Hydraulic operators generally have their manual release under a cover on the motor or separately sited on the pump. These can sometimes be more complicated to use compared to a simple key release, so it is vital to have the correct operation instructions clearly visible so gates can be released easily and quickly should an emergency arise.
At Gate Safe we view the manual release as a critical part of the system. Of course, we all hope that there will never be cause to use it, but if a scenario does present itself, there must be confidence that it will be working properly

-
Safety edges on the closing phase of swing gates
Safety edges on the closing phase of swing gates
Gate Safe recently carried out a survey on some swing gates following a serious incident.
The gates in question were double leaf swing gates, featuring an open infill tube and rail construction, standing at about 2.1m high and 4m wide. They were automated using 24v rams in fully automatic operation, and photocells had been fitted inside and out. Safety edges had been installed horizontally to the bottom rails on the inside of site to cover the opening. A vertical edge was fitted to cover the reducing gap as the gates closed. Two further edges had been fitted to the walls that the leaves opened up towards, to prevent any crushing risk from the motors. Anti-finger trap guards were installed to cover the reducing gap at the hinges. All sounds great.
But think about it. NO SAFETY EDGES HAD BEEN FITTED TO THE OUTSIDE OF THE GATES.
As a result of this omission the following occurred. An elderly lady in her 80s was waving goodbye to her friend as she departed in her car. The lady was standing in the gate way, between the two pairs of photocells as the leaves started to close. The lady noticed the gates moving but could not move out of the way quickly enough. The leaf struck her and knocked her to the ground and then carried on trying to close. Eventually the gate’s obstacle detection system kicked in as she was being drawn underneath and the leaf retracted, but then tried to re-close, hitting her again. She was positioned approximately half-way along the gate leaf, so the force would roughly be twice that of the force at the slam stile of the gate. It was only the quick reactions of a passing neighbour who picked the lady up and moved her, that prevented a catastrophe. The victim suffered severe bruising and cuts and required a hospital visit.
Sadly, this is not a one-off incident. All too often we witness installers adopting the cavalier attitude that safety edges are not required on the outside of swing gates. But remember gates move in two directions! The risk of impact and drawing in exists just as much in the closing direction as it does in opening phase, as the above accident testifies. The force towards the hinge is much greater than at the slam stile and inherent force limitation does not remove the risks.
In the case of the gates detailed above, subsequent to the event, full length safety edges have now been fitted to the bottom of the leaves on the outside of site, creating a much safer system.
Check out the extensive guidance and risk assessment documents in the Gate Safe members area www.gate-safe/members to ensure you are up to speed with the correct placement of photocells and safety edges – and ALL essential protocols to ensure a safe and compliant installation.

-
Choose the right equipment for the job in hand!Choose the right equipment for the job in hand!

We often report on the fact that all too often decisions to install various systems are based on price rather than their suitability to fulfil a function properly. But equally, we frequently see that a customer has been advised to install the wrong choice of automated entrance system to meet the desired objectives.
For example we have witnessed incidences where a swing or sliding gate has been installed when in fact a traffic barrier would have been a considerably cheaper, equally fit for purpose solution.
Barriers fitted with skirts may be installed to enhance their visibility to oncoming traffic. Gate Safe questions whether visibility might be better boosted by using modern boom lighting, which makes the arm highly visible even in daylight. This dispenses with the requirement to protect the proposed fitting of a skirt with complicated and often expensive safety devices to cover the extra risks presented by the additional skirt feature. However, if security or stopping pedestrian access is an issue, a gate should be installed rather than a barrier as a skirt will not deliver high security.
Large slow- moving sliding gates represent a great choice for high security situations, but due to their limited opening / closing speed, they are too slow for situations which require effective traffic control.
Conversely barriers are great for traffic control, but deliver limited levels of security and are not designed for pedestrian use.
Swing gates are somewhere in the middle! They deliver higher security than barriers and offer a faster operation than sliding gates so in some situations, may offer a sufficient traffic control measure.
For a situation where security and traffic control are both a priority, a bi-folding gate - sometimes called a speed gate - should be considered, where the opening / closing cycle will typically be a few seconds.
Always remember, it will be easier to ensure the safety of the design of the correctly selected equipment rather than trying to retrofit the safety to an unsuitable installation. If in doubt, make sure you ask the experts! -
Horizontal safety edges on swing gatesRob's Top Tips

Horizontal safety edges on swing gates
One of the most common causes for concern that we still regularly witness on swing gates is the absence of safety edges on the bottom of the gates. People tend to believe that an edge is only required when a leaf is opening onto a crushing hazard. This is not the case, because a significant impact and dragging / drawing in risk will always exist, especially since the level of force on the leaf increases towards the hinge area.
Inherent force limitation - which is now commonly available on modern equipment - is useful, but is not 100% reliable in terms of mitigating the risks of impact, dragging and drawing in. These very dangerous risks will need to be dealt with by employing other methods - namely safety edges on the bottom of gate leaves - which is the most common solution to the risk issue for gates - and preferably by non- contact devices such as light curtains, laser scanners and photocells.
When fitting the safety edges, it is vital that they cover the full length / width of the gate and are fitted as low as possible. An additional support bar may need to be fitted to allow the correct installation of the safety edges. Some design consideration may be required to ensure that the area nearest the hinge (where the force will be greatest) is protected and that manual release mechanisms on underground operators remain accessible. -
3 gate accidents in 2 weeks, 0 excuse!3 gate accidents in 2 weeks, 0 excuseIn a chilling reminder of the events of 2010, when two children were killed in separate automated gate accidents in a space of 11 days, almost 9 years later Gate Safe is aware of reports of three accidents involving manual sliding gates over a course of two weeks. Thankfully there have been no fatalities reported but the three cases all point to the same failure to observe a critical safety protocol for sliding gates – whether they are in automatic or manual operation – which relates to the fitting of end stops.

In normal automatic operation most, sliding gates position themselves at the open and closed positions by the use of limit switches or encoders. In the event of these failing or becoming damaged it is possible for the gate to potentially continue running further than it should and missing the support posts. This will result in derailment or the leaf falling over and causing serious injury or worse – as was evidenced by the tragic death of Jill Lunn in Norwich in April 2013. This could very easily happen on a manually operated gate, or on an automated gate which has been put into manual operation. Indeed, one of the recently reported cases involved a sliding gate in a school setting, that had been changed from an automated to manual operation. The gate over-ran and fell on a child causing a serious but thankfully not fatal injury. It is absolutely imperative that there are multiple physical stops fitted in both the open and close positions so that in an unexpected situation the gate cannot over run the correct position and travel out of its guides. These stops need to sufficiently strong and fitted correctly to negate the possibility of the gate over travelling.
Gates found without end stops should be taken out of service until remedial works have been carried out and need to be securely held in a position that ensures that no accidental movement can occur until the necessary corrections have been made.
Commenting on the worrying spate of sliding gate accidents, Ian Ripley, CEO of the Association of Fencing Installers (AFI) said, “We would urge all of our members to take the Gate Safe training to help them fully understand the key risks associated with sliding gates – whether they are manual or automated – and more importantly, to ensure that they take the appropriate action to mitigate against such risks to prevent the occurrence of any further accidents. As professionals in our field, we must lead the way to encourage best practice - in line with Gate Safe’s recommendations – to safeguard our customers and the general public.”
In addition to fitting end stops there are other risks with sliding gates such as a single point failure, for more advice on this and additional risks associated with manual gates in general, refer to the Gate Safe website or contact us info@gate-safe.org or call 01303 840 117.
Gate Safe is committed to raising awareness of the relevant steps to be taken to ensure the safety of ALL gates (not exclusively automated gates). -
Logic functions with a safety upgradeLogic functions with a safety upgrade
Installers may be asked to survey an existing automated gate and find the safety devices to be inadequate and therefore in need of an upgrade.
The fitting of safety edges, photocells, light curtains or other electronic safety measures may be required and these will need to work in either the opening or closing phases of the gate.
It is vital that the installer checks that the existing logic / control board is capable of working in the desired mode of operation.
The gate must revert away from the hazard in either the opening or closing phase and this will be achieved by the logic board interpreting the signal received from the safety device that has been employed. However, this obviously assumes – possibly incorrectly - that the board has been correctly wired and is capable of acting in the required way.
A ‘stop’ input must not be used to connect safety edges as this could potentially hold and trap someone against the gate or obstruction. In addition, when the stop input is activated, it would prevent a possible subsequent ‘move’ signal to the system.
Installers should also be aware that older logic boards often don’t include a safety reversion input that works in the gate’s opening phase. Such a feature is essential to prevent reaching through - as well as impact and crushing - risks which have been the cause of a number of fatalities.
The above factors must be taken into consideration at the survey stage, and if appropriate, a new logic or control board with the desired capabilities should be recommended to deliver the necessary functionality. If this important issue is not addressed at the earliest juncture it could result in a costly mistake or an unsafe installation.
Don’t ever assume that when a gate requires safety edges that the existing board will accommodate them.
Finally, when fitting safety devices always undertake a physical check to ensure that they are working as expected/required. If these vital safety devices are not configured correctly it can cause a serious injury, for technical help please get in touch, info@gate-safe.org. -
Welding on siteWelding on site
Part of Gate Safe’s remit is to carry out independent surveys on existing automated gate systems. During such a survey, one of our first priorities is to look at the actual physical structure of the gate.
In the case of swing gates, our attention would firstly focus on the hinges and support posts. Our findings are often worrying, especially if the hinges have been adapted from one type of operator to another, for example changing from an underground motor to a ram. This would entail a lot of welding and fabrication on site and which ultimately results in a considerable level of structural change to the gates.
We have come across numerous cases where the hinges have not been welded strongly enough, possibly because they are welded by unqualified engineers. This results in cracks in the posts or hinges and misalignment of the leaves, which can instigate a significant risk of the gates falling over, especially if in addition, one of the hinges is inverted.
We strongly advocate that welding is best carried out in the workshop rather than on site and always by a suitably qualified NVQ level 2 welder. This would allow proper testing and inspection and would guarantee a stronger – and therefore safer end result. If this is not possible, then thorough checks should be carried out post the welding. Consideration should also be given to the use of extra safety supports such as a gate tether or a third hinge.
Always remember, the failure of one component in an automated gate installation can lead to a catastrophic and potentially tragic outcome … -
Emergency stop buttonDo I need an emergency stop button?
Many people ask if an emergency stop button is mandatory on an automated gate system.
The Machinery Directive states that an emergency button should be fitted.
BUT this is pertinent to a machine shop type of equipment such as a lathe or pillar drill which only operates in one direction.
See excerpt below from the Directive:1.2.4.3. Emergency stopMachinery must be fitted with one or more emergency stop devices to enable actual or impending danger to be averted.The following exceptions apply:— machinery in which an emergency stop device would not lessen the risk, either because it would not reduce the stopping time or because it would not enablethe special measures required to deal with the risk to be taken,
Gate Safe believes that in normal situations the fitting of a stop button is not appropriate.
Why?
Consider the unfortunate scenario of someone being trapped in an automatic gate. In this instance, the activation of the emergency stop would disable the system but not help release the victim. The gate would be stopped from moving if a further open or close signal was received, or indeed if any safety circuits were activated intended to move the gate away.
Therefore, activating an emergency stop button could potentially trap someone, as it would stop the gate from moving away and releasing pressure on the victim.
Such devices should only be used if it is possible to move the gate with ease when the motor is not running (non-locking motors, for example) or the stop control also reverts the gate a few centimetres.
Even then they may create a security risk if they have been activated in error or as a result of an act of malice.
Always remember to carry out a residual risk assessment when fitting any equipment and consider all the various scenarios that could lead to an accident! -
Maintenance Matters…Maintenance Matters
Regular maintenance is critical to ensure a safe and compliant automated gate. Most gates should be maintained a minimum of every six months (more frequently for gates which are exposed to exceptionally heavy usage) by a Gate Safe Aware installer who has undergone the requisite specialist training to demonstrate the necessary skills and knowledge to appreciate the requirements of a safe automated gate installation.
Just as you need to keep an eye on how a car is running in between formal services, anyone who has responsibility for an automated gate must be prepared to review the condition of the gate on a regular basis, outside of the biannual services.
Here is a simple checklist detailing the important factors influencing the safety of an automated gate – we recommend that these checks should be made formally on a monthly basis. However, we would also encourage anyone that uses the gate to keep an eye out for any signs of damage / excessive wear and tear.
• Are the photocells clean and clear of any debris which could hinder their ability to track a moving object? Excessive plant growth, litter, leaves, even snow can seriously compromise the efficiency of a photocell?
• Are the photocells operating correctly on an opening and closing cycle?
• Are the hinges of the gate able to move with ease? Consider whether there is a need to lubricate the hinges or any other moving parts / does the gate move freely when operating?
• Are there any visible signs of wear and tear? This would include any deterioration in the rubber that features on the safety pressure edges or hinge protectors?
• Is the control box still intact? No loose wires? No obvious signs of any ingress of dust / water?
• Is the warning sign on the gate still legible? If fitted, is the warning light / audible signal in working order?
• Are you able to release the gate manually? Is the manual release key easy to access?
If you are unsure of any of the above requirements, please contact your nearest Gate Safe Aware installer, find them HERE -
Check those safety edges…Check those safety edges
Gate Safe has received information claiming that in certain circumstances the effectiveness of safety edges can be compromised as a result of a fault between the safety edge controller and the gate controller, resulting in the loss of the safety function.
Let’s keep it simple, all edges should be checked weekly to ensure that they are working. There is no need for a weekly engineer visit, simply position something in front of the various edges when the gate is operating and make sure that the gate stops and backs off when it comes into contact with the object.
Taking the time out do this on a weekly basis will ensure you have a safe gate! -
Power outage? Problem sorted…Power outage? Problem sorted!
Here’s a simple yet highly effective response to dealing with the frustrating (and possibly dangerous) problem associated with manually releasing an automatic gate in the event of a power cut.
Rather than waste precious time trying to find the manual release keys / key holder, why not supply a neat key safe which contains the keys with every gate sold? The safe can be installed on the post or adjacent to the post and all gate users should be notified of the safe code. That way they will have instant access to the release key if the power fails. -
Mind the gap…Mind the gap!

Salford City Council has been fined £20,000 after a six-year-old boy with autism and learning difficulties lost the tips of three fingers when his hand became trapped in a school gate in 2012. The incident occurred because there had been a failure to fit a guard over the gate hinges, despite the fact that the risk assessment on the gate had revealed that staff needed to be vigilant and supervise children through the gates. The gap in question reduced from 8mm to nothing … Gate Safe speculates that there are many other gates in operation within a school environment that also feature gaps that reduce enough to represent a significant risk. So our advice to everyone is check those gaps!
However, the blame cannot simply be placed on the school. I did a survey at another school last week and identified an automatic gate that was decidedly unsafe. The school was under the impression that they had been supplied a “new” gate but in reality it was second hand! It would seem that purchasers not only need to spell out that they want a CE marked gate, they also want a newly manufactured one!
Regular maintenance is critical to ensure a safe and compliant automated gate. Most gates should be maintained a minimum of every six months (more frequently for gates which are exposed to exceptionally heavy usage) by a Gate Safe Aware installer who has undergone the requisite specialist training to demonstrate the necessary skills and knowledge to appreciate the requirements of a safe automated gate installation. -
Laser Scanner - An improved approach to the safety of automated gates

Laser Scanner - An improved approach to the safety of automated gates
As the lead charity associated with raising awareness of the safety considerations in relation to automated gates, Gate Safe is constantly reviewing new technologies and new products which might deliver an improved level of protection to protect against potential injury. We all hope that one day, safety measures for powered gates will have evolved to a level which totally anticipates any risk of an accident.
I recently met with a laser scanner supplier to review the capabilities of a product which projects four laser curtains fields in front or behind a gate or barrier. The laser scanner concept is based on tried and tested technology which has been in existence for over 10 years. If the laser curtain is broken, the gate / barrier will halt and if required, will return. Gate Safe has always maintained that the very best form of safety is when a gate is prevented from touching a person. The laser scanner detection system achieves this, covering a much broader spectrum than a single photo-cell.
For me, the beauty of this device is that each curtain can trigger a different response for the gate / barrier. Example, three curtains can be focused on safety and one can be configured to represent a virtual switch activated when the curtain is interrupted in a certain place.
Some laser versions can be installed to act as a ground loop to enable free exit, whilst also providing an added safety device under the boom. This avoids the expense of running cables underground and the associated disruption of digging up a road, which will is definitely an added-value for the end customer.
The scanner clearly offers some useful ‘added extras’ and definitely delivers a full safety of the leaf for any automated gate installation, detecting small objects or persons. Other bonuses are that it requires minimal maintenance: you simply need to keep the lens clean. The scanner is rated IP65, operates in extreme temperatures from – 30oC to + 60oC. Any other security features like force or speed limitation are not needed.
The equipment is supplied with a 2-year warranty although the expected life expectancy is close to 20 years. The price point is circa £1200 but be aware that this does not include labour costs to install the device. That said, this is not dissimilar to the cost of pressure edges.
Installation is easy and is carried out using a hand-held programmer but if necessary a support during the installation can be available.
Gate Safe would strongly recommend all installers give this device serious consideration. For more details visit http://www.bea-industrial.be/en/products/product-range/lzr-i100/ -
Horizontal photocellsHorizontal photocells

It is generally standard practice to fit photocells vertically, but there are occasions when restrictions on space dictate the need to mount a photocell in a horizontal guise.
A recent site visit to a property in North London revealed an important issue which can potentially arise when wireless photocells are installed horizontally. Vibration can affect the battery casing and the batteries can eventually become dislodged, resulting in a failure in the gate’s operating system (the gate should cease to operate if the safety device fails).
On speaking to the manufacturer of the photocell, the following advice has been issued specifically in relation to photocells that are being installed horizontally, to ensure their continued efficient operation:- If permanent power is not an option, adapt the fixing to ensure the battery remains fixed
- To prevent any water ingress (more likely in a horizontally installed photocell) apply a small bead of silicone along the exposed join of the photocell
-
Focus on finger guardsFocus on finger guards

The purpose of a finger guard on an automated gate is to deliver added safety to the device, by restricting potential access (especially by children) between the gate post and the gate itself and reducing the risk of becoming caught between the exposed hinge and the gate.
However, just as an incorrectly sited photocell will fail to offer the desired added safety protection, a poorly fitted finger guard may actually result in creating a trap hazard to the gate. For optimum results, the finger guard should always be protruding outwards. If the protective shield is bulging inwards, the efficacy of the guard is compromised and here is a chance that a finger / hand could still become trapped.
Whilst on the subject of finger guards, it is important to remember that these should always be removed as part of any routine maintenance check to enable the condition of hinges to be thoroughly assessed. Remember hinges should always feature bearings rather than grease which can attract dust and cause operating problems resulting in excessive wear to the hinge pin. Gate Safe is aware of a clear plastic finger guard which obviously offers improved visibility of the condition of any hinges, however, the guard should still be removed at the time of inspection.
Address:
Gate Safe
Beverlea, Clavertye,
Elham, Canterbury
Kent. CT4 6YE

Working together with Gate Safe
Gate Safe is a registered charity in England and Wales (no 1149261).
Gate Safe and the Gate Safe logo are registered trade marks of GSSC Ltd.
© 2010- Gate Safe GSSC Ltd
The guidance and recommendations on this website represent our interpretation of advice based on information from HSE, British Standards and relevant UK legislation. It is not a definitive statement and should be used in conjunction with your own risk assessment of the specific site prior to undertaking any works. GSSC Ltd take no responsibility for any works carried out by the Gate Safe Aware Installers or for any installations carried out using the information and advice given on this website. All content, trade marks, downloads and images are copyright Gate Safe GSSC Ltd
Website by Kikk |